aperture priority mode

What is Aperture Priority in Photography

Aperture is the opening between the lenses that lets the light into the image sensor. Wider the aperture opening, more light enters the sensor resulting in a brighter image and vice versa.

Camera Layout-1

It is measured in f-number (f1.4, f2, f2.8, f4, f5.6, f8, f11, f16, f22); smaller f-number means wider aperture/opening and a larger f-number means smaller aperture/opening.

Aperture

Aperture, ISO and Shutter Speed form the Exposure Triangle that helps in creating the desired photograph.

Light Trinity

Aperture Priority Mode

Aperture Priority

Aperture Priority Mode, one of the photography basics, appears as A or Av on your DSLR mode dial. This mode gives you control over the Aperture setting. In this mode, you set the aperture according to your creative intent; the DSLR will set the shutter speed for you according to the lighting conditions to make correct exposure.

When to use Aperture Priority Mode

During Daytime

Aperture Priority Bird Photography

Use Aperture Priority Mode when there is good light. For instance, you are photographing a resting bird. You want to blur the background and make the bird stand out in your photograph, go for the widest aperture opening (smallest f-number) between f1.4 and f4 in your DSLR camera. Set the ISO to 100 or 200; DSLR will set the shutter speed for you. By using these settings, your subject (bird) will stand out and the Depth of Field will be shallow.

Landscape Photography
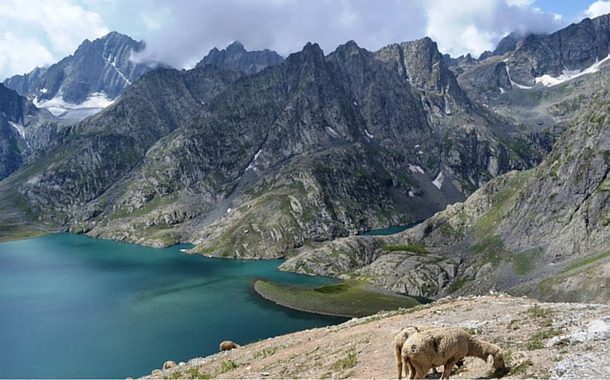
Aperture Priority Landscape Photography

For clicking pictures of landscapes, use Aperture Priority Mode. Since landscapes usually have a foreground or a backdrop and if you want everything in the scene to come out sharp, Aperture Priority Mode comes in handy. Go for the smallest aperture opening (largest f-number) say f16 or f22 in your DSLR camera. DSLR will set the shutter speed for you. With these settings, everything in your photograph will be in focus resulting in deep Depth of Field.

Portrait Photography

Aperture Priority Portrait Photography

For Portrait Photography, use Aperture Priority Mode. Similar to Bird Photography, you can use wider aperture opening (smaller f-number) in your DSLR camera for Portrait Photography. This way, your DSLR will focus on the person being portrayed, the subject stands out while the background appears blur.

When Not to use Aperture Priority Mode

At Night

In a Dark Room

To capture Night Landscapes

In Poorly lit environment

Instead, use Shutter Priority Mode to photograph under above conditions for good images.

We bring you ‘Jo & His Camera’ Comic Strips wherein a Magical Camera gives DSLR photography tutorials to Jo.

To understand Aperture Priority, Click on the below Image to see the Comic wherein the Camera explains Jo, the concept of Aperture Priority with the help of practical examples.

Aperture Priority


When you do photography: Remember the 5E’s – Explore, Experiment, Experience, Enjoy & Express. 

Do Share The Learning – Like It, Post It, Pin It, Tweet It!

hdr photography

How to do HDR Photography?

Did you know our cameras cannot see the same way, the human eyes can see? Well, the human eyes can see a huge range of light & details, both in bright and dark parts of a scene at any one time whereas our camera (sensor) cannot see as much details in bright & dark parts of a scene at any one time. This gives rise to the need of HDR Photography which is used when the exposure is affected due to the presence of extreme contrasts/tones in a scene. 

High Dynamic Range (HDR) is useful for capturing the detail in the darkest and lightest elements of an image. Most of the high-end DSLR Cameras have built-in HDR mode.

In this mode, the DSLR takes a series of images of the same scene with different exposures/brightness levels, then combines them to create one final image. Here, the photographer can set the exposure and the number of images the DSLR must shoot.

Since the DSLR will reduce the shutter speed for dark exposure, you will have to use a tripod to prevent camera shake/blur. HDR is ideal for Landscape Photography and Night Time Photography.

What if I don’t have HDR mode in my DSLR Camera

Well, check the menu in your DSLR for Exposure Compensation (Expo.comp) or Auto Exposure Bracketing (AEB) setting. It will help you capture HDR photos and bring out the highlights and shadows of the image.

How to use Auto Exposure Bracketing to capture HDR photos

Auto Exposure Bracketing

Exposure Compensation (Expo.comp) or Auto Exposure Bracketing (AEB) allows you to adjust the meter’s exposure value. With this option, you can set the exposure value from -5 to +5 (it will vary depending on the DSLR camera you are using).

At 0, you will get an image with normal exposure; at -1 you will get a slightly underexposed image and at +1 you will get a slightly overexposed image. Experiment with different exposure settings and take a series of photographs of the same scene. Later, combine these photographs into a single image using post-processing software like Adobe Lightroom or Adobe Photoshop to create the image, close to what you remember seeing while photographing it.

We bring you ‘Jo & His Camera’ Comic Strips wherein a Magical Camera gives DSLR photography tutorials to Jo.

To understand HDR Photography, Click on the below Image to see the Comic wherein the Camera explains Jo, the concept of HDR Photography with the help of practical examples.

HDR Photography

When you do photography: Remember the 5E’s – Explore, Experiment, Experience, Enjoy & Express to develop your own style as a photographer. 

Do Share The Learning – Like It, Post It, Pin It, Tweet It!


What is Metering in Photography

A DSLR Camera has a built-in light metering sensor that takes the light reading. Metering is one of the photography basics. It measures the brightness of the scene to be photographed. It divides the image into multiple areas and measures their brightness separately. Accordingly, it sets the Aperture, Shutter Speed and ISO to make a correct exposure.

Different Metering Modes include Evaluative or Matrix Metering, Center-Weighted Metering, Spot Metering and Partial Metering. You can select the Metering Mode according to your creative purpose and create amazing photographs.

We bring you ‘Jo & His Camera’ Comic Strips wherein a Magical Camera gives DSLR photography tutorials to Jo.

To understand Metering, Click on the below Image to see the Comic wherein the Camera explains Jo, the concept of Metering.

metering

When to use different Metering Modes in DSLR Camera

Matrix/ Evaluative/ Segment/ Honeycomb Metering

This metering mode is the default metering mode in a DSLR and is apt for most scenes. If you have a Nikon DSLR, it will appear as Matrix Metering and if you have a Canon DSLR, it will appear as Evaluative Metering. In this mode, the metering sensor divides the entire scene/frame into multiple areas and reads the light and dark tones of each area. Then, the metering sensor compares the autofocus point/ the area where you have set the focus with rest of the areas and decides the appropriate exposure required to create the image.

Ideal for Landscape photography.  

Center-Weighted Metering

In Center-Weighted Metering, the metering sensor measures the brightness of the entire frame but gives more emphasis/weightage to the centre of the frame than the rest area. It doesn’t take into consideration the corners of the frame. Hence, it is best suited when your subject to be photographed lies at the centre of the frame.

Ideal for Portrait photography. 

Spot Metering

In Spot Metering, the metering sensor measures the brightness only around your focus point in the entire frame/scene. It covers a very small area. It can be anywhere from 2% to 5% of the frame; however it will vary depending on the DSLR camera you are using. Based on this spot area, the metering sensor determines the exposure. Hence, you can use this mode when your subject does not take much of the frame.

Ideal for Bird photography.

Partial Metering

You’ll find Partial Metering mode in some of the Canon DSLR cameras. There is not much difference between Spot Metering and Partial Metering; except that Spot Metering covers 2% to 5% of the frame whereas Partial Metering covers a little bit more area which is approximately 8% to 10% of the frame in the centre.

Ideal for bright backgrounds especially with backlit subjects.

Click on the below Image to see the Comic wherein Jo experiments with different Metering Modes and succeeds in mastering Metering.

Metering

macro photography

What is Macro Photography

Macro Photography

Macro Photography allows you to capture sharp, close-up pictures of small subjects that bring out the fine details. Subjects can be insects, flowers or inanimate objects.

Macro photography

To understand Macro Photography, let’s first understand Magnification Ratio which determines how large the subject/object will appear in your photograph.

A Magnification Ratio of 1:1 implies that when you take a picture from the closest distance, the image formed on the camera sensor will be a life-size image (of the same size as the subject is in real life).

Macro lens is used for macro photography. It offers a magnification ratio of 1:1 aka life size magnification.

To get a better understanding of 100mm macro lens, check this link https://www.amazon.com/Canon-100mm-Macro-Digital-Cameras/dp/B002NEGTSI

Minimum focus distance for 100mm macro lens is 30cms whereas for 35mm macro lens is 13cms; to get life-size image, you’ll have to go closer to the subject in case of 35mm macro lens.

To get a better understanding of 35mm macro lens, check this link https://www.amazon.com/Canon-EF-S-35mm-2-8-Macro/dp/B06Y1HQDQQ 

Insect Photography Macro Photography

Insect Photography

Macro Photography Butterfly

Macro lens is different from a telephoto or zoom lens. A telephoto/zoom lens brings distant subjects closer (like bird photography) while a macro lens is designed to focus and capture images of small subjects (like insects) that are very close to the camera/camera’s sensor to bring out their details. 

Zoom lens offer magnification but have much larger minimum focus distance.

To get a better understanding of 250mm zoom lens, check this link https://www.amazon.in/Canon-55-250mm-4-5-6-Telephoto-Camera/dp/B0056E49MK

With 250mm zoom lens, the minimum focus distance is 110cms (1.1m) with a magnification ratio of 1:3. (image of your subject will be smaller in comparison to 1:1).

Macro photography tips


Some of the other areas of Macro Photography include Photographing Eyes and Photographing Flowers.

We bring you ‘Jo & His Camera’ Comic Strips wherein a Magical Camera gives DSLR photography tutorials to Jo.

To understand Macro Photography, Click on the below Image to see the Comic wherein the Camera explains Jo, the concept of Macro Photography with the help of practical examples.

Macro photography

Macro Photography Tips for You

If you are using lens with longer focal length of 100mm and above, you need not be very close to the subject while photographing it.

On the other hand, if you are using lens with focal length shorter than 100mm, you will have to get closer to the subject to photograph it.

(Remember: Do not take your camera closer to the subject than the lens’ minimum focus distance or else it won’t be able to focus and even if you release the shutter button to take the shot, it’ll not allow you to click the photo/release the shutter)

Click here to read the blog on how to get better focus in photography and conditions where camera’s Autofocus (AF) mode finds it difficult to set the focus point and hence switching to Manual Focus (MF) mode is recommended (photographing very small subjects is one of them).  

When you do photography: Remember the 5E’s – Explore, Experiment, Experience, Enjoy & Express to develop your own style as a photographer.

Do Share The Learning – Like It, Post It, Pin It, Tweet It!

Did this blog help you with some ideas to improve your photography skills? For more useful photography tips, examples, ideas & inspiration, please subscribe below to receive notifications of new blog posts by email. Thank you!


← Back

Thank you for your response. ✨

depth of field photography

What is Depth of Field and Bokeh in Photography

Depth of Field (DOF), one of the photography basics, is how much of the scene in your photograph is in focus. It is the scene in front of and behind the focus point in your picture which looks decently sharp.

To read the blog on how to get better focus in photography, click here 

Factors that affect Depth of Field include Aperture, Distance between you/camera and the subject photographed and the Focal Length of your camera lens.

Relationship between Aperture and Depth of Field

Camera Layout-1

Aperture is the opening that lies between the lenses of the camera that allows light to enter the image sensor.

Aperture

Wider you set the aperture opening, more light will enter the image sensor and vice versa.

Aperture is measured in f-stop or f-number. Aperture opening and f-stop (f-number) are inversely related. Wider the aperture opening, smaller the f-number; smaller the aperture opening, larger the f-number.

For instance, if you click a photograph using aperture of say f/4 (small f-number and wide aperture opening), you will be able to see the subject clearly in your snap but the backdrop will appear blur which is known as Shallow depth of field.

And if you take a snap using aperture of say f/16 (large f-number and small aperture opening), the subject as well as the backdrop in your photograph will be clearly visible which is known as Deep depth of field.

Wide Aperture opening = Small f-number = Shallow depth of field

Small Aperture opening = Large f-number = Deep depth of field

How does Distance control Depth of Field

The closer your DLSR camera is to the subject, shallower will be the Depth of Field. Farther your DLSR camera is to the subject, deeper will be the Depth of Field. Hence, maintain the distance between the DLSR camera and the subject being photographed according to your creative purpose.

How does Focal Length of your DSLR Lens control Depth of Field

Focal length will vary depending on how you adjust the camera lens while photographing a scene. For example, in a Canon EOS 1500D DSLR Camera, if you shoot with a wide angle lens, say using 18mm lens, your photo will have a Deep Depth of Field. And if you zoom the lens to 55mm to photograph the scene, your image will have a Shallow Depth of Field

We bring you ‘Jo & His Camera’ Comic Strips wherein a Magical Camera gives DSLR photography tutorials to Jo.

To understand Depth of Field, Click on the below Image to see the Comic wherein the Camera explains Jo, the concept of Depth of Field.

depth of field

Understanding Bokeh

Bokeh, a Japanese word, means blur produced (by the lens) in the out-of-focus area of a photo that lie outside the Depth of Field. Bokeh are circular or hexagonal shapes created while photographing a scene with a wide aperture opening, say f/2 (Shallow depth of field) when the lens display out-of-focus points of light.

You can create Bokeh in Portrait Photography if you use wide aperture (shallow depth of field) to make the subject stand out against a blur backdrop. Alternatively, you can also produce Bokeh effect using a small aperture only in cases when the backdrop is far enough.

Check out the below 2 photographs: Aperture of f/4.5 was used to create Bokeh – shape of out of focus light in the background. Here Focus was set on the Panda Teddy Bear.

Bokeh Effect in Photography

Bokeh Effect on Ganesh Chaturthi

You can use the below light sources to create the Bokeh Effect:

  • In the house, you can use Fairy Lights or Lamps in the background
  • Outdoors especially for Portrait Photography, you can use sunlight coming through the trees
  • City (low) light at night

You can also use the Bokeh Effect creatively.  For instance, the below image gives the illusion that the circular, colourful lights are coming out from the container, but in reality- the container is close to the DSLR camera whereas the fairy lights are at a distance from the DSLR and the container.

Bokeh in Photography

Click on the below Image to see the Comic wherein Jo experiments with different Camera Settings and succeeds in mastering Depth of Field.

Depth of Field

When you do photography: Remember the 5E’s – Explore, Experiment, Experience, Enjoy & Express to develop your own style as a photographer.  

Do Share The Learning – Like It, Post It, Pin It, Tweet It!

Did this blog help you with some ideas to improve your photography skills? For more useful photography tips, examples, ideas & inspiration, please subscribe below to receive notifications of new blog posts by email. Thank you!


← Back

Thank you for your response. ✨